Wednesday, May 25, 2011

Chocolate Cream Cupcakes

It's 9:30 on a Tuesday morning.  The bowl of Cheerios with sliced bananas that I had for breakfast at 7:00am seems like a distant memory.  My stomach and my mind are having an internal battle:  "Should I?"  "No, don't do it!"  "But I'm reeeealy hungry!"  "You'll regret it later."  "Oh shush!"  Stomach wins!

I grab a dollar from my purse, make my way down to the vending machine in our office kitchen, and start to browse.  Chips?  No.  Candy bar?  Nah.  Same bag of cashews that seemingly has been in the machine for the past 3 years?  Um, no.  Oooh, what's this??  Hostess Cupcakes??  And we have a winner!

As I walk back to my office, I'm happily thinking about how much I used to love Hostess Cupcakes as a kid.  Chocolatey cupcakes with a rich creamy filling...mmmmm!  Am I in for a treat!

I sit down at my desk, quickly unwrap them, and take my first bite, waiting for the nostalgia to wash over me...but wait...hmmm...something isn't right here.  I take another bite.  These cupcakes are...well, they're OK.  Only OK.  There's nothing wrong with them, they just aren't anything spectacular.

As I polish off the first of the two cupcakes, I decide to read the ingredient list.  Egads!!!  I'm eating a chemical cupcake!  (This did not stop me from gobbling down the second cupcake, mind you.)  But it gets me thinking..."Didn't I see a recipe for a homemade version of these cupcakes recently?"  To the Internet!

The first places I check are my go-to recipe sources, Cook's Illustrated and Cook's Country.  Sure enough, Cook's Country has just the recipe I was looking for.  So I make up my shopping list, hit the store on the way home from work, and let the baking begin!

Start by heating the oven to 325 degrees and grease and flour a 12-cup muffin tin.

In the first bowl you see, I have combined 1 cup all-purpose flour, 1/2 teaspoon baking soda, and 1/4 teaspoon salt.  In the large glass bowl, I have 1/3 cup cocoa powder, 1/3 cup semisweet chocolate chips, and 1 tablespoon of instant espresso.  The other ingredients here are 3/4 cup of sugar, 1/2 cup of vegetable oil, 2 large eggs, and 1 teaspoon of vanilla.


I added 1/2 cup of boiling water to the cocoa, chocolate chips, and espresso, and whisked it until it was smooth.  Then I added the sugar, sour cream, oil, eggs, and vanilla and mixed that until it was all combined.


Next, I whisked in the flour until it was incorporated.


I divided the batter evenly amongst the muffin cups.


And baked them for 18-22 minutes (22 in my case) until a toothpick inserted into the center of a cupcake came out with just a few dry crumbs. 


I cooled the cupcakes in the tin for 10 minutes...


then turned them out onto a wire rack and let them cool completely.


While the cupcakes cooled, I worked on the cream filling.

In a large bowl, I combined 3 tablespoons of water with 3/4 teaspoons of unflavored gelatin.  I let this sit for about 5 minutes.  Then I microwaved the mixture for about 30 seconds, until the mixture was bubbling around the edges and the gelatin had dissolved.


Next, I stirred in 4 tablespoons of softened, unsalted butter, 1 teaspoon of vanilla extract, and a pinch of salt.


Then I let the mixture cool for about 5 minutes, and whisked in 1 1/4 cups marshmallow creme (fluff).


It's tough to whisk in the fluff at first.  It's very sticky and clumpy.


But if you just keep whisking...


and whisking...


and whisking...eventually all the lumps will smooth out and you'll have a nice creamy mixture, like this:


Once this was all smooth, I put it in the refrigerator for 30 minutes, to set.

While I waited for the filling, I started on the glaze and the cupcake assembly.

I microwaved 1/2 cup of semisweet chocolate chips with 3 tablespoons of butter, stopping to stir every 30 seconds, until the mixture was smooth.


Next, I cut a cone shape out of the top of each of the cupcakes...


and then sliced off the inner part of the cone.


This left me with a plate full of cupcake innards.  What to do, what to do?  (I'll let you figure it out.)


A handy tip is to keep the tops next to their corresponding cupcakes.  This way you won't run into tops that no longer seem to fit once you assemble them.


By this point in the process, the filling was ready to come out of the fridge.  I put 1/3 cup of the cream filling into a plastic bag fitted with a small plain tip.  (To be used for decorating later.)

With the rest of the filling, I spooned it evenly into the cupcake bases...


and put the tops back on to each of the cupcakes.


Next, using a spoon, I glazed each of the cupcakes, making sure to have the chocolate cover the cut parts of the cupcake.


Once they were all glazed, I piped little white swirls across the cupcakes.


Technically speaking, Hostess Cupcakes all have seven swirls.  That's OK...I still think mine are pretty!


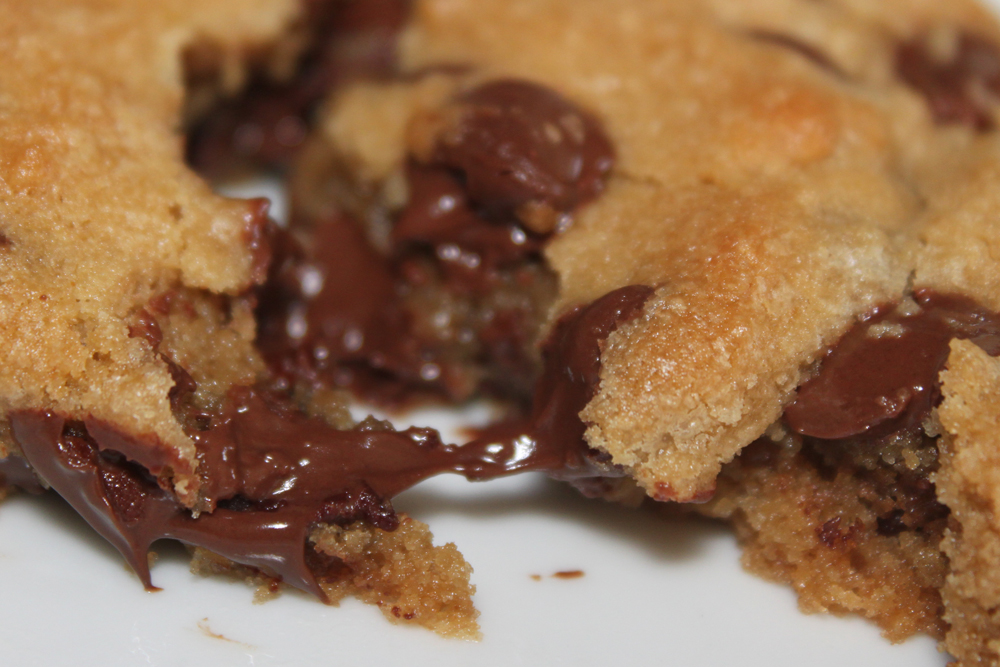
Here's what they look like on the inside.  Ooooooh...Aaaaaah!


These cupcakes were so much tastier than the Hostess Cupcakes.  They have so much more chocolate flavor, and they taste like they were made with real ingredients.  (Imagine that.)  Plus, they're fun to make. Start to finish, I'd say that these took me about an hour and a half to make.

My husband and co-workers loved them, so I'm adding this recipe to my 'keepers' file!

For the full recipe, check out Cook's Country - Chocolate Cream Cupcakes.

Tuesday, May 10, 2011

Out with the Eggs!

Last night, to the delight of my husband, I decided to make another batch of Cook's Illustrated's Perfect Chocolate Chip Cookie.  However, this time I made a few adjustments to their recipe.  Our daughter has an egg allergy, so I wanted to make a version that she could eat.

I have read online about different egg substitutes that you can use when baking, and it looked like the best option for cookies was to substitute applesauce for the egg.  I added 3/8 cup of applesauce (I've learned that you should substitute 1/4 cup per egg.) in place of the one egg plus one egg yolk that the original recipe calls for.

I made two other adjustments to the recipe as well.  The original recipe yeilds 16 fairly large cookies - a bit too large for my young daughter to manage.  Instead of scooping out 3 Tablespoons of batter per cookie, I made these cookies with just 1.5 Tablespoon of batter per cookie. 

Since the result was going to be a smaller cookie, I also opted for mini chocolate chips instead of the larger chips that I used when making the original batch.


The cookies came out really well with these changes.  There are two things that I think I will change the next time I make this 'egg-free' version of the recipe.  The applesauce added extra sweetness to the cookies, so I think that I could reduce the amount of sugar that is added to the dough.  I'm also going to try reducing the number of chocolate chips in the dough by a bit.

In the end, I would say that this variation on the original recipe was a hit.  My daughter liked the cookie a lot, my husband thought they tasted great, and had I not known that there were no eggs in the batter, I don't think I ever would have suspected it.  The cookies still had the great crisp edges, chewy centers, and butterscotch undertones.

I brought the cookies into work today, and they received rave reviews.  No one seems to have noticed that they are egg-free.

For the very last tray that went into the oven, I mixed chopped walnuts into the dough.


I had a hard time deciding which I liked better; with or without the walnuts.  Fortunately for me, I don't have to decide...I can have one of each!  (Oh, the joys of being an adult.)

Thanks to Cook's Illustrated for giving me a good starting-off point for a recipe that will be the new Chocolate Chip Cookie standard in our house!

Monday, May 2, 2011

C is for...

Cristina?  Well, yes, I like to think that is what C is for.  But we all know what C is really for...COOKIES!  Not just any cookies, but Cook's Illustrated's Perfect Chocolate Chip Cookies.


Before we start baking, let me explain a little bit about this blog.  I have been toying with the idea of starting a blog for quite some time now.  I knew that I'd like to write about baking and cooking, because it is a great passion of mine and I love taking pictures of the things that come out of my kitchen.  I also have been a very big fan of America's Test Kitchen, Cook's Illustrated, and Cook's Country.  So when ATK posted a Blogger Challenge, I was finally inspired to start writing this blog.


The challenge proposed is to blog about making one of my favorite desserts/snacks:  Chocolate Chip Cookies.  Their Perfect Chocolate Chip Cookie recipe promises cookies with a moist and chewy interior, crisp edges, and deep notes of toffee and butterscotch...OK, I'm sold!


OK, let's bake!
 Start by heating the oven to 375 degrees and adjusting your oven rack to the middle position.

Line 2 large baking sheets with parchment paper.  I recently got these pre-cut half-sheet parchment papers from King Arthur Flour and they are very handy.  I highly recommend them if you, like me, hate having to cut down larger sheets of parchment to fit your pan perfectly.

Whisk 1 3/4 cups (8 3/4 ounces) of flour with 1/2 teaspoon of baking soda and set aside.  I prefer to weigh my ingredients when possible because it will produce the most accurate results.

I have to tell you that this is my favorite part of the recipe, and I'll tell you why after this photo.

In a 10-inch skillet, heat 10 Tablespoons of unsalted butter over medium-high heat, until it has melted.  This will take about 2 minutes.

That's right - we're melting the butter!!!  There have been so many times that I have wanted to bake something that requires "softened butter" only to realize that I forgot to leave the butter out.  No worries with this recipe - we're just tossing the butter in the skillet! 

Continue to cook the butter, swirling the pan constantly, until the butter is a dark golden brown.  I pulled the pan off after 3 minutes.

Pour the browned butter into a large bowl and stir in an additional 4 Tablespoons of unsalted butter, until it is completely melted.

Add 1/2 cup (3/1/2 ounces) of sugar, 3/4 cup (5 1/4 ounces) of packed brown sugar*, 1 teaspoon of salt, and 2 teaspoons of vanilla extract to the butter and whisk it until it is fully incorporated.

*Make sure you use fresh, moist brown sugar.  I learned from Cook's Illustrated that the hardened brown sugar will make your cookies dry...and nobody wants that, right?

Add one egg, plus one egg yolk and whisk for about 30 seconds, until the mixture is smooth.

Let the mixture stand for 3 minutes, then whisk again for another 30 seconds. 

Repeat this process two more times, until the mixture is thick, smooth, and shiny.  You can really see the difference in color and texture from the image above to the one below.

Add the flour and baking soda to the mixture.

Stir the flour mixture in until it is just combined.

Stir in 1 1/4 cups semi-sweet chocolate chips.  You can also add 3/4 cup toasted, chopped pecans or walnuts at this point, if you so desire.  (Sometimes I feel like a nut...today, I don't.) 

Make sure no flour pockets remain in the dough.

I'm using Ghirardelli Semi-Sweet Chips, which were one of the recommended brands in Cook's Illustrated's 2009 Dark Chocolate Chip taste test.

Divide the dough into 16 equal portions.  Each cookie will be about 3 Tablespoons worth of dough.  I have a 1 1/2 Tablespoon scoop, so I'm using two scoops per cookie.

Arrange 8 dough balls per cookie sheet, being sure to keep them 2 inches apart.
Look how pretty they are...and it's only going to get better from here!

Bake one tray of cookies at a time, until the cookies are golden brown, puffy, and the edges have begun to set, but the centers are soft.   This will take about 10-14 minutes.  (Mine were in for 13 minutes.)  You should also rotate the tray, halfway through baking.

The recipe recommends that you transfer the baking sheet to a wire rack and cool the cookies completely before serving. 

Um...sorry Cook's Illustrated, as much as I respect your advice and take your recommendations, I'm still going to have one cookie (OK, I admit it, two cookies) while they are piping hot!


I don't know what kind of super powers you have that you're able to resist a hot chocolate chip cookie, fresh from the oven, but I certainly do not possess these same powers.  I mean, really, who can resist ooey gooey warm chocolate chip cookies?


This recipe was very easy to make.  I'd estimate that it took me about an hour from start to finish.  I actually made them on my lunch break from work one day, and later came home to a very happy husband with a belly full of chocolate chip cookies. 

I want to try a couple of different versions of the cookie; one with walnuts or pecans included and one substituting applesauce for the egg (for my daughter who has an egg allergy).  I'll post the results of both of those variations here for you once I've tried them.

Thank you to Cook's Illustrated for yet another successful recipe (and for starting me on my blogging journey)!